Big Picture of Real-time Rendering
*This post is focused on Deferred Rendering

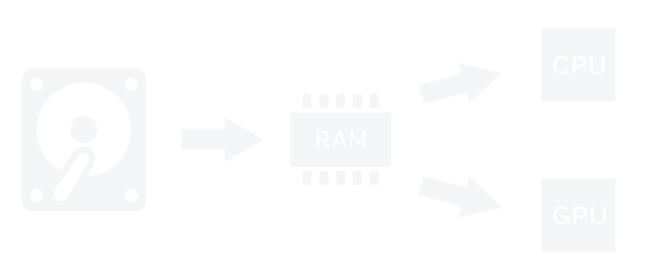
Roughly speaking, it happens like this: Hard drive → RAM → CPU ⇆ GPU
It starts where your computer stores information on its hard drive.
Next, this information is transferred to RAM.
When project is running, Memory(RAM) stores the information. Also it’s important to understand that bandwidth is related to transferring information.
Then, the information will be transferred to CPU/GPU from Memory.
They are calculated in CPU and go back and forth between CPU and GPU. Both CPU and GPU have its own part in rendering but they are in sync most of the time. That is why either can be the bottleneck of each other. That means, as long as GPU is heavy loaded, your project will run slow, even if CPU performance is perfect. In this case, no matter how you unload CPU, it won’t help your overall performance. That is why you need to know where the problems are in order to properly optimize.
Breakdown of Real-time Rendering
Before rendering
There are some preparations before rendering. The actual rendering happens after GPU.

1. CPU
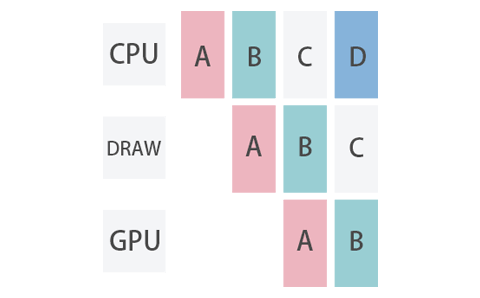
CPU and GPU are calculated at the same speed and are in sync, however the CPU thread runs first. Before rendering, CPU checks ‘where and what’ the objects are.
2. Draw(primarily CPU)
Draw thread receives information calculated in CPU and decides ‘what to show’. Because it will be too heavy if it renders everything it receives. Listed below are the calculations that draw threads handle in order – easier calculations first so that heavier calculations will have less objects to handle later on. These calculations happen per object.
- ① Distance Culling: Cut out objects depends on distance
- ② Frustum Culling: Cut out objects that are out of camera
› Always on. - ③ Precomputed Visibility: Cut out objects depending on a designated area.
› It’s a bit tricky to use. Although it helps CPU, it’s heavy on memory. Because each volume you put has to store quite a lot of information. - ④ Occlusion Cullung: Final pass on which object to show
› It tends to get heavy if there are more than 10000 objects to calculate.
3. GPU
Now that we have everything we need, the actual rendering will start – geometry rendering. It will be calculated per drawcall.
What are the Draw calls?
It’s important to understand what draw calls are. If you’re not sure, read this article.
Start of rendering
Using the information of geometry previously prepared, the actual rendering will begin in this order below. Note that depending on your material setting, DepthPass is computed before or after Pixel Shader.
Vertex Shader ⇨ Rastarizer ⇨ G-buffer ⇨ Pixel Shader(Lighting and Shadow etc) ⇨ Post Process
1. Vertex Shader(GPU only)
Vertex Shader is used for variety of animations such as foliage swaying in the wind.
To clarify, it’s just offsetting the vertices, not changing the model itself. It will not calculated in CPU. For instance, this animation below of clouds is also just offsetting the vertices of the model. That is why collisions etc are calculated at the original position. Also Vertex Shader is highly optimized and good for performance.
2. Rasterizer
It’s a calculation happens per draw call and convers 3D date into pixels. It happens in the back ground and you cannot really control. In that sense, it’s not so important to understand.
3. G-Buffer
G-buffer is a group of rendered images and they are generated after rasterization. Combined with rasterization, this process is called ‘BassPass’. It’s very important and basic part of rendering. These images are used to marge for materials and lighting. From this point you use information from G-buffer only for any calculation, not from geometry. To put it very simply, it’s like filtering in Photoshop.
G-buffer uses quite a bit of graphic memory (vRAM) and bandwidth.
4. Pixel Shader
As well as geometry rendering and draw calls that occurs with it, it is the part the has the most impact on performance. But since each topic has a lot to talk about, I will explain in a different article.
Post process
Post process refers visual effects that occurs at the end of the process.
It uses Pixel Shader processing and reuses G-Buffer and combines images. Because there are also many topics that cover this, so I will put together a separate article including specific examples. The followings are planned.
- › Make a custom Grain Effect with Post Process
- › Stylized Filter with Post Process Material

[…] Also draw call is not the only factor in performance and you need to consider other factors such as pixel shader. The numbers below are just a rough estimate and again, it depends on what kind of game […]
yes